Try Data Engineering in Python with Snowpark in Just 10 Minutes [new feature]
End of Line Matters for Shell Script in CICD Pipeline
End of Line Matters for Shell Script in CICD Pipeline
Introduction to Shell Script on UNIX (1)
Introduction to Shell Script on UNIX (1)
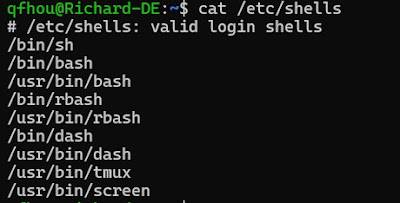
Shell解析器
HelloWorld example (helloworld.sh)
创建脚本程序
脚本的执行方式
1 bash/sh + 脚本的相对路径/绝对路径
sh
$sh ./helloworld.sh
$sh /home/qfhou/bash_study/helloworld.sh
Similarly for bash
$bash /home/qfhou/bash_study/helloworld.sh
2 采用输入脚本的相对路径/绝对路径执行脚本 (脚本需要具有可执行权限)
$./helloworld.sh
$/home/qfhou/bash_study/helloworld.sh
变量
特殊变量
What are horizontal and vertical scaling in data engineering
Horizontal and vertical scaling
This pic tells you the difference between vertical and horizontal scaling.
How to get into a Docker container
How to get into a Docker container
Solution 1 (Terminal):
Solution 2 (Docker + Terminal):
Solution 3 (Docker):
Top 20 Git Commands
git config
Usage: git config –global user.name “[name]”
Usage: git config –global user.email “[email address]”
This command sets the author name and email address respectively to be used with your commits.
git init
Usage: git init [repository name]
This command is used to start a new repository.
git clone
Usage: git clone [url]
This command is used to obtain a repository from an existing URL.
git add
Usage: git add [file]
This command adds a file to the staging area.
Usage: git add *
This command adds one or more to the staging area.
Usage: git add .
This command adds one or more to the staging area.
git commit
Usage: git commit -m “[ Type in the commit message]”
This command records or snapshots the file permanently in the version history.
Usage: git commit -a
This command commits any files you’ve added with the git add command and also commits any files you’ve changed since then.
git diff
Usage: git diff
This command shows the file differences which are not yet staged.
Usage: git diff –staged
This command shows the differences between the files in the staging area and the latest version present.
Usage: git diff [first branch] [second branch]
This command shows the differences between the two branches mentioned.
git reset
Usage: git reset [file]
This command unstages the file, but it preserves the file contents.
Usage: git reset [commit]
This command undoes all the commits after the specified commit and preserves the changes locally.
Usage: git reset –hard [commit]
This command discards all history and goes back to the specified commit.
git status
Usage: git status
This command lists all the files that have to be committed.
git rm
Usage: git rm [file]
This command deletes the file from your working directory and stages the deletion.
Git log
Usage: git log
This command is used to list the version history for the current branch.
Usage: git log –follow[file]
This command lists version history for a file, including the renaming of files also.
git show
Usage: git show [commit]
This command shows the metadata and content changes of the specified commit.
git tag
Usage: git tag [commitID]
This command is used to give tags to the specified commit.
git branch
Usage: git branch
This command lists all the local branches in the current repository.
Usage: git branch [branch name]
This command creates a new branch.
Usage: git branch -d [branch name]
This command deletes the feature branch.
git checkout
Usage: git checkout [branch name]
This command is used to switch from one branch to another.
Usage: git checkout -b [branch name]
This command creates a new branch and also switches to it.
git merge
Usage: git merge [branch name]
This command merges the specified branch’s history into the current branch.
git remote
Usage: git remote add [variable name] [Remote Server Link]
This command is used to connect your local repository to the remote server.
git push
Usage: git push [variable name] master
This command sends the committed changes of master branch to your remote repository.
Usage: git push [variable name] [branch]
This command sends the branch commits to your remote repository.
Usage: git push –all [variable name]
This command pushes all branches to your remote repository.
Usage: git push [variable name] :[branch name]
This command deletes a branch on your remote repository.
git pull
Usage: git pull [Repository Link]
This command fetches and merges changes on the remote server to your working directory.
git stash
Usage: git stash save
This command temporarily stores all the modified tracked files.
Usage: git stash pop
This command restores the most recently stashed files.
Usage: git stash list
This command lists all stashed changesets.
Usage: git stash drop
This command discards the most recently stashed changeset.
Featured Posts
SnowPro Badges and Certificates
SnowPro Badges and Certificates Online Verification https://achieve.snowflake.com/profile/richardhou888/wallet

Popular Posts Recommended
-
SnowPro Core Certification: Data Loading and Unloading (4/8) ✅warehouse and parallel loading XS sized warehouse can load eight files paralle...
-
Please generate a smiling border collie with this pic Not bad: 🔝border collie 💚sunset
-
Basic UNIX commands Know more about a cmd use $man command Directory pwd Show your Present Working Directory mkdir Make a directory cd dirna...
-
SnowPro Core Certification: 通过考试和下一步(7/8)【本系列完结】 感谢看到这系列的最后一篇💗💗💗💗💗💗💗 欢迎点赞,评论,和转发! 这一系列主要是我学习考证SnowPro Core Certification的总结。把分散在Snowf...
-
How to train a border collie of 5-month old Certainly! Training a 5-month-old Border Collie can be both rewarding and fun. These intelligent...
-
SnowPro Core Certification: Performance Concepts (3/8) ✅ Performance Snowflake's unique architecture and the underlying micro-partitions...


